
Question :
I have a corrupt .sparsebundle-file (a TimeMachine-backup file), that I would really like to fix, because there’s some files in there that I need.
I have tried using the Disk Utility app, but that didn’t work.
I also read that it should be possible to use the Terminal app to do this, but I’ve never used the Terminal app before, and I can’t find clear directions on how to do it…
What exactly should I do ?
Answer :
The Terminal app is not a regular OSX-application, it is a command-line tool (a.k.a. console) to program and reprogram in the underlings of OSX (more or less like the DOS-prompt in Windows). So, as you are going out of the ‘OSX comfort zone’ when you start using the Terminal app, you should beware since messing things up there can really mess up OSX, and lead to having to re-install OSX.
Having that said, here’s a step-by-step guide to fixing your .sparsebundle-file using the Terminal app :
– first, connect your backup-drive (the one with the broken .sparsebundle-file on it) to your Mac, using a USB- or FireWire-cable
note : if the backup-drive is inside a Time Capsule, you’ll probably be best of getting the harddrive out of the Time Capsule (as outlined in this iFixit How-To) and then temporarily hooking it up to your Mac using something like this SATA-to-USB connector (or an old USB-harddrive-enclosure). Even though this breaks the warranty on your Time Capsule, it’s probably the best solution since the direct USB-connection is much faster than the usual network-over-ethernet-connection… (and bringing the Time Capsule in to an Apple-dealer for repair, will definitely mean losing all your data, since that is part of the regular repair-policy… and bringing it to a specialized data-recovery company will cost more than buying a new Time Capsule)
– then, open the Terminal app (which can be found in the Utilities folder that is in the Applications folder)
– in the window that opens, you will see the name of your Mac followed by a colon (:) and a tilde (~), so if the name of your Mac is MacBook Pro, you will see :
macbook-pro:~
that is the “prompt”, when you see that, you can start typing the commands
note : some basic knowledge about working in the Terminal :
- each line of commands (a.k.a. “command line”) you type should be activated by pressing the ENTER-key
- as long as you do not see the prompt, the Terminal app is still busy executing your last command line
- the Terminal can not handle names with spaces in them, as spaces play an important roll in a command line ; they separate the subsequent commands given in one command line, e.g. if your backup-file’s name is MacBook Pro.sparsebundle, the Terminal app requires you to type is as MacBook\ Pro.sparsebundle or you can type the entire path to the file in quotation marks, like : “…/…/MacBook Pro.sparsebundle” (another option is to temporarily change the filename to one that has only letters and numbers in it)
- you don’t need to type the entire path to a file’s location in a command line manually, you can just drag-and-drop the file itself onto the command line and the entire path to the file will be automatically generated (a handy trick to prevent mis-typing)
- when typing your password in the Terminal, the cursor will not progress, so there will be no visual feedback whatsoever about what you’ve typed… so, type your passwords only with total focus on what you’re typing !
- ! BEWARE : be sure to double-check your typing when using the command line, as one mis-typed letter can generate an entirely different, unwanted outcome, screwing up your entire OSX installation !
- when working in Terminal app on a MacBook (Pro/Air), the advice is not to use an external keyboard, but the on-board keyboard
Now, when you see the prompt appearing, type this (followed by pressing the ENTER-key) :
admin$ sudo su –
Then, when you see the prompt appearing again, type this (followed by pressing ENTER) :
root# chflags -R nouchg [drag .sparsebundle-file here]
Then, at the next prompt, type this (and press ENTER) :
root# hdiutil attach -nomount -noverify -noautofsck [drag .sparsebundle-file here]
And at the next prompt, type this (and ENTER) :
root# tail -f /var/log/fsck_hfs.log
Look closely in this next file when you need to type what, and what the feedback should look like (kind of) :
- bold green text = this is the command line prompt
- bold black text = you should manually type exactly this text
- bold purple text = drag-and-drop your .sparsebundle-file here, and your sparse bundle’s path will be displayed
- black text = this text is generated by the Terminal, indicating what is busy and/or finished, and will be the same when your replicate this proces
- blue text = what is displayed here depends on your specific situation
- if problems are found, they will be listed in-between these lines, and it will also be indicated how it was fixed
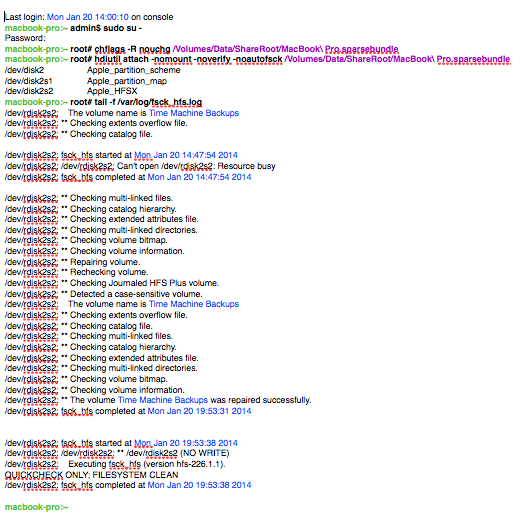
note : as you can see from the time-stamps in the picture, the entire process will take quite a long time to complete (it took nearly 6 hours to repair this harddisk – a 500GB harddrive that was temporarily taken out of a Time Capsule and connected via USB2.0)
so, from there on it’s wait, wait, wait, do something entirely different, wait (again), get a good night’s sleep… and wake up in the morning with a repaired hard drive…
that should be it 😉


I tried this and its just stuck at this point – http://cl.ly/image/2h0r2L3X2v2D
Any ideas what to do?
@Benjamin :
I might be misunderstanding your problem…
As far as I can see your output is exactly the way it should be,
so it could be that you still have to wait some more hours until the process has totally finished,
or the process has already ended and the .sparsebundle-file should already be repaired…
…from your info, I can’t tell which is your situation…
Good Luck !
My corrupted external TM backup drive is for a macbook pro running on Yosemite. In the meantime, my Yosemite is plagued with a problem of spinning beachball every 60 minutes. Can I use another machine running on snow leopard to repair the corrupt .sparsebundle-file. Any advice is much appreciated.
@Chessom : [or is it Cheesom ?]
Sorry to hear you haven’t been able to fix your TimeMachine problems yet.
Judging from my own experience, there might be a problem (bug ?) in OSX 10.10 “Yosemite” with TimeMachine.
The best way to solve this it doing these :
1- disconnect your TimeCapsule base-station (if that’s your TimeMachine backup drive) from power for at least 10 seconds, then re-plug to restart the TimeCapsule
[if you have a USB-connected TimeMachine backup drive, eject it from the Finder (drag to the Trash), then unplug the USB-cable, shut off it’s power, re-plug the USB-cable, and restart it’s power]
2- go to Time Machine Preferences (in System Preferences), switch OFF Time Machine and restart you Mac
3- go to Time Machine Preferences (in System Preferences), there click on the “Select Disk…”-button and select the drive with the identical name of the previous TimeMachine-backup disk from the bottom half of the popup list and click on the “Use Disk”-button, and switch ON Time Machine (on the left)
[this way you are creating a fresh connection to the original backup drive]
4- then go to Time Machine (the clock-lie icon) in your upper menu bar and click on “Backup now” in the
…and wait
[this might take some time, as Time Machine will now start checking if the old .sparsebundle-file is still useable, and use it as a starting point if it is…]
If that doesn’t do any good…
You’re on the edge of my comfort zone…
I would probably do the following, but you have to make your own judgement on the risk you are willing to take to loose everything :
I would say the Terminal.app in OSX 10.6 “Snow Leopard” would generally do the same as the Terminal.app in newer (and older) versions of MacOSX (and OSX) so I would expect the same result and I would expect no extra risk [but you can still loose everything – beware !]
so if you dare, and you feel like it’s your only option left, try to repair the corrupt .sparsebundle-file from your “Snow Leopard”-Mac…
Hope this helps.
Good Luck !
😉
I also have a corrupt 500GB sparse bundle (getting the error: no mountable file system). Trying to repair via Terminal, but getting the line -bash: admin$: command not found. Any ideas how to make it work? …
@Ron :
Thanks for your feedback !
Sorry to hear this doesn’t work for you yet.
As I have little knowledge of using the Terminal, I’m not sure, but my best guess would be either one of these :
(A) you are not logged in as an administrator on your Mac
(B) you did not follow the instructions to the letter
(C) you are using a newer version of OSX than the one used in the original post (OSX 10.9 Mavericks), which may have changed things in the accessing permissions needed to execute the commands listed [e.g. OSX 10.11 El_Capitan has introduced SIP / System Integrity Protection, which restricts some permissions]
If you need more help on this, I would suggest posing your question on a developer-level forum like :
http://superuser.com
Good Luck !
😉
Thank you. Indeed, I am using El Capitan .. And that may be the reason. Best, RC
@Ron / @RCarter :
using El_Capitan might be the cause of your problem,
but there must be a way to tweak the original solution to still be able to use it in OSX 10.11 El_Capitan
you might find someone able to help you on this in one of these forums :
http://discussions.apple.com
http://forums.macrumors.com
https://www.ifixit.com/Answers
http://superuser.com
https://macosx.com
I’m interested to hear if you find a working solution.
Please report back 😉
Thanks for this info, very helpful
My test has been running for 25 hours. ;-0
Is there a way to know if it’s still running?
So far the last two entries are:
QUICKCHECK ONLY; FILESYSTEM DIRTY
/dev/rdisk1s2: fsck_hfs completed at Thu Jul 20 10:06:46 2017
Thanks
W
@Wilsondo :
Thanks for the feedback 😉
Since you got “fsck_hfs completed”, the procedure has finished,
but you got FILESYSTEM DIRTY where you should have gotten FILESYSTEM CLEAN
From what I know, that means that you mistyped something in the “chflags” command…
So, unmount the volume (= harddrive), then mount it again and redo the entire Terminal procedure as described in the original post.
Hope this helps.
Enjoy 😉
I am stuck at the same spot as @wilsondo. Mine said FILESYSTEM CLEAN, though. You said that “fsck_fhs completed” means the procedure has finished, so I tried double clicking to open my backup and it still said no mountable file systems and then new entries appeared in the terminal, this time QUICKCHECK ONLY; FILESYSTEM DIRTY. Any ideas?
@Cooper :
Thanks for the feedback.
Sorry to hear this doesn’t work for you yet.
I’m not too sure about a solution myself, but in this post https://discussions.apple.com/thread/2465249?start=75 on the Apple Discussions Forums, a user named “morph21” (March 22, 2012) can be quoted for this solution :
—–
Remember that other window with the “tail -f /var/log/fsck_hfs.log” command? You should have seen some activity there.
If you get this:
/dev/rdisk1s2: fsck_hfs run at Thu Mar 22 11:45:37 2012
/dev/rdisk1s2: ** /dev/rdisk1s2 (NO WRITE)
/dev/rdisk1s2: Executing fsck_hfs (version diskdev_cmds-540.1~34).
QUICKCHECK ONLY; FILESYSTEM DIRTY
Then you did NOT do the chflags command properly. Detach the image and go back and check what you could have done wrong.
To detach:
hdiutil detach /dev/disk1
“disk1” unmounted.
“disk1” ejected.
Again, this is in my case. If you got anything different when you ran hdiutil attach, then that is what you want to put here.
—–
hope this helps
Good Luck !
Hi guys
Funnily enough, I was going to report back today, as I’m still struggling.
Everything went well, but after the the first new back-up, then next morning TC had lost connection, it looks like there are two mounts everytime… i.e. timecapsule and timecapsule-1.
I gave up and haven’t touched it again.
I’m beginning to suspect the drive is actually faulty.
Is there any easy way to diagnose the HD?
I’ve decided to do a re-format, as nothing was working well.
I’ll see what’s what, in 4 days when it’s finished.
;-(
@Wilsondo :
That’s an odd problem you’re encountering.
The official way to check the quality of your Time Capsule’s harddrive is outlined here :
https://support.apple.com/en-us/HT202174
If you do that, I suggest you to connect the Time Capsule to your Mac using an Ethernet (UTP) cable, as that’s way faster than doing this over WiFi
On the other hand, if you’re not afraid to take the harddisk out of the Time Capsule, I would even suggest to do that, since you can then hook it up to your Mac as a ‘regular’ external drive, so you can use any disk problem detection & repair program you choose on it (e.g. DiskWarrior).
…and if the harddisk turns out to be ‘unrepairable problematic’ you already have the Time Capsule open and you can easily put in a new harddisk op any memory size you like…
hope this helps 😉
Good Luck !
Since it may be of use to readers: I have read that sparse images are fine but there should only be one master images that is propagated to copies (by the copying of the internal bands). Any work on the copy and attempt to then interconnect with the old master will probably corrupt. Thus write access to copies should be carefully controlled.
People who try to network to a sparse image from multiple platforms and *nix boxes (and they do) should take great care I suspect.
@cwinte :
Thanks for your feedback.
I agree with your advise not to connect to a TimeMachine-sparsebundle file from another computer as long as the sparsebundle file is okay. Even if the sparsebundle file is corrupt I would suggest trying to repair it from the originating Mac first, and only if that doesn’t work you might consider fixing it from another Mac (or PC if you don’t have any other Mac available within your area).
😉
start terminal
sudo su
hdiutil attach -nomount -readwrite NAME.sparsebundle.
You force mount image
you will see the mounted image in the disk utility
after that – download R-STUDIO – Demo. https://www.r-studio.com
starting scan mount image (not sparsebundle mount). After scan, You will get the result – lost folders and files. To save files – you will need to buy a program
this method helped me
@Dmitry :
Thank you for your feedback.
I cannot verify the quality of the R-Studio application, so I would advise to try an alternative solution first, since the R-Studio Demo will only give an index of recoverable files and the full version of R-Studio that is needed to repair the .sparsebundle-file will cost you $80
For most people that is probably not an interesting alternative to the free recovery method outlined in the original post…
Great post, loved the no mount command
@Stefanos :
Great to hear !
Thanks for the feedback – enjoy 😉