fixed : frozen Dock in macOS ( Dock not responding )

Question :

For some reason, when I started/opened my Mac today and tried to open an app by clicking on it’s icon in the Dock… nothing happened. The Dock didn’t respond… I couldn’t get any app, folder or file to open by clicking on it’s icon in the Dock…

I found a workaround by opening the search window (by clicking on the magnifier icon top right in the macOS menu bar), then typing the application’s name and starting it from there.

But, I want this fixed… what can I do to get the Dock working properly ?

Answer :

There isn’t a clear reason why the macOS Dock freezes up from time to time… so there is no solution that will work in all cases, but to get the macOS Dock working properly again try these (in this order) :

1 – try upgrading to the most up-to-date version of macOS :

  • in the macOS Menu Bar, click on the Apple-icon top left
  • in the pulldown menu that opens, click on “System Preferences” (or “System Settings”)
  • in the System Preferences window (System Settings window) that opens, click on “Software Update” ( the gear / sprocket icon )
  • in the Software Update window that opens, see if there are any new updates to macOS available
  • if there are any, update a.s.a.p. by following the on-screen instructions
  • if there are none, try the next option

2- try restarting your macOS :

  • in the macOS Menu Bar, click on the Apple-icon top left
  • in the pulldown menu that opens, click on “Restart” and follow the on-screen instructions
  • after your Mac has restarted, check if your macOS Dock works now
  • it the Dock now works properly ; great ! well done ! enjoy !
  • if the Dock still doesn’t respond, you can try restarting your Mac by using the “Shut down” option …or try the next option

3- try resetting the Dock using the Terminal.app :

  • in the macOS Menu Bar, click on the magnifier-icon top right
  • in the search field that opens, type “terminal”
  • click on the Terminal.app in the list that appears
  • in the Terminal window that opens, don’t be distracted by the info displayed, just type the following :
  • killall Dock
  • then press Return
  • most of the time it only takes a flash of a second to rested the Dock, sometimes it takes a few moments
  • now quit the Termini.app
  • then click on any app icon in the Dock to see if it starts up and the Dock behaves as expected
  • if it does ; great ! well done ! enjoy !
  • chances this doesn’t work are very, very low… so if this didn’t work, redo the reset of the Dock using the Terminal.app again before trying your last options : keep using a work-around (as mentioned above) until Apple releases a macOS upgrade …or reinstalling macOS on your Mac.

that’s it !

enjoy 😉

Advertisement

fixed : quick way to make hidden files visible on macOS

Question :

I sometimes need to view the invisible files on my Mac. I know I can do this using the Terminal.app, but isn’t there an easier way to do this ?


Answer :

To turn on the ‘Hidden File Viewer’ (or ‘Invisible File Viewer’) mode in MacOSX, you could use the command line in Terminal.app or you could use little apps named something like ‘Hidden File Viewer’ or similar.

In macOS 10.12 Sierra and newer, there is a far simpler way to do this :

  • press the [SHIFT] + [CMD] + [.] key-combo on your keyboard

Using this key-combo, you can switch the visibility of invisible files ON or OFF.

That’s it !

enjoy 😉

fixed : This file sever will not allow any additional users to log on

Question :

I got this error “This file server will not allow any additional users to log on, please try again later” when I tried to access files that were on my network, but not on my Mac itself.

How can I fix this ?

Answer :

You can get this error when trying to connect to either another Mac or a Time Capsule in your network. The solution depends on the type of ‘server’ you are trying to connect to.

-A-

On a Mac running a normal (non-server) version of MacOSX, only 10 clients can be connected at the same time. If you get this error, despite the fact that you have less than 10 clients connected, try this :

– on the Mac you want to connect to, open the Terminal.app and type this command :

sudo defaults write /Library/Preferences/com.apple.AppleFileServer idleDisconnectOnOff -bool YES

– then press RETURN and you will be asked for your password

– type your password, press RETURN, quit the Terminal.app and you’re done (please note that the cursor will not move while typing your password in Terminal.app)

– whenever you want to undo (or reverse) this action, follow the same routine, but use this command :

sudo defaults write /Library/Preferences/com.apple.AppleFileServer idleDisconnectOnOff -bool NO

-B-

If you get this error message when connecting to a Mac and you need to have more than 10 clients connected, try this :

– upgrade the version of MacOSX you’re running (on the Mac you want to connect to) to the server-version of MacOSX, as OSX Server can handle an unlimited number of clients ; you can get the latest version of OSX Server in the Mac App Store

-C-

If you are trying to connect to a Time Capsule and you get this error message, the problem is something completely different. The Time Capsule can handle up to 50 clients at the same time, so chances of running into that limit in a regular household are low. But, the average internet provider has a limit of only 10 concurrent internet connections on it’s modem at the same time, so if you get this error when trying to connect to a Time Capsule, the 10 internet connections limit will probably be the cause. So try this :

– startup the AirPort Utility on your Mac

– click on the Time Capsule icon so the ‘info balloon’-window will open

– click on the “Edit”-button

– in the window that opens, click the “Network”-tab/button

– at “Router Mode:” select “DCHP and NAT”, so not “Off (Bridge Mode)”

– then click on the “Network Options…”-button

– in the window that opens, at “IPv4 DHCP Range:” select a range of IP-addresses that is different from your internet modem’s IP-range. So, if your internet modem’s IP-range is 192.168.1.xxx select an IP-range like “192.168.2.2 to 200” and click the “Save”-button

– in the next window, click the “Update”-button

– then, back in the ‘info balloon’-window of your Time Capsule, at “status” you will get “Double NAT” with an error mark (yellow dot) next to it… so, click on the “Double NAT”-text and in the pulldown-menu that opens, select “Ignore”

…that’s it !

Enjoy !

😉

Donate Button (MacManusNL)


fixed : run DOS commands on your Mac

Question :

I need to run a firmware update for a hard drive, but there’s no firmware update available for MacOSX, there’s only a firmware .exe-program for MS DOS.

How can I run that on my Mac, since I don’t have a Windows-PC available ?


Answer :

MacOSX isn’t able to run DOS commands in the MacOSX Terminal.app…

and running FreeDOS from a USB-stick isn’t an option on your Mac, since your Mac can’t boot from non-EFI volumes…

but there’s a very simple option to run DOS commands in OSX :

– download & install Boxer by drag&dropping the app into your Applications folder

– run the Boxer.app and you will get 3 options, one being “Open a DOS prompt”, that’s the one your looking for

– click on it, and you will have your DOS-prompt

– and just as you can in OSX Terminal.app, you can drag&drop .exe-files (and other files) into the prompt, and the correct path to the file will be automatically inserted into the prompt

– there’s just one small drawback : the Mac’s keyboard layout is not supported… so even though the letters will be what you see on your keyboard, most other characters will not… to get a – [minus], you should type / [slash], and to get ” [brace], you should type @ [at] on your Mac keyboard… (you can figure out the other ones yourself by just trying)

That’s it !

Enjoy !

😉

Donate Button (MacManusNL)


fixed : use the Terminal to repair corrupt .sparsebundle-file

Question :

I have a corrupt .sparsebundle-file (a TimeMachine-backup file), that I would really like to fix, because there’s some files in there that I need.

I have tried using the Disk Utility app, but that didn’t work.

I also read that it should be possible to use the Terminal app to do this, but I’ve never used the Terminal app before, and I can’t find clear directions on how to do it…

What exactly should I do ?

Answer :

The Terminal app is not a regular OSX-application, it is a command-line tool (a.k.a. console) to program and reprogram in the underlings of OSX (more or less like the DOS-prompt in Windows). So, as you are going out of the ‘OSX comfort zone’ when you start using the Terminal app, you should beware since messing things up there can really mess up OSX, and lead to having to re-install OSX.

Having that said, here’s a step-by-step guide to fixing your .sparsebundle-file using the Terminal app :

– first, connect your backup-drive (the one with the broken .sparsebundle-file on it) to your Mac, using a USB- or FireWire-cable

note : if the backup-drive is inside a Time Capsule, you’ll probably be best of getting the harddrive out of the Time Capsule (as outlined in this iFixit How-To) and then temporarily hooking it up to your Mac using something like this SATA-to-USB connector (or an old USB-harddrive-enclosure). Even though this breaks the warranty on your Time Capsule, it’s probably the best solution since the direct USB-connection is much faster than the usual network-over-ethernet-connection… (and bringing the Time Capsule in to an Apple-dealer for repair, will definitely mean losing all your data, since that is part of the regular repair-policy… and bringing it to a specialized data-recovery company will cost more than buying a new Time Capsule)

– then, open the Terminal app (which can be found in the Utilities folder that is in the Applications folder)

– in the window that opens, you will see the name of your Mac followed by a colon (:) and a tilde (~), so if the name of your Mac is MacBook Pro, you will see :

macbook-pro:~

that is the “prompt”, when you see that, you can start typing the commands

note : some basic knowledge about working in the Terminal :

  1. each line of commands (a.k.a. “command line”) you type should be activated by pressing the ENTER-key
  2. as long as you do not see the prompt, the Terminal app is still busy executing your last command line
  3. the Terminal can not handle names with spaces in them, as spaces play an important roll in a command line ; they separate the subsequent commands given in one command line, e.g. if your backup-file’s name is MacBook Pro.sparsebundle, the Terminal app requires you to type is as MacBook\ Pro.sparsebundle or you can type the entire path to the file in quotation marks, like : “…/…/MacBook Pro.sparsebundle” (another option is to temporarily change the filename to one that has only letters and numbers in it)
  4. you don’t need to type the entire path to a file’s location in a command line manually, you can just drag-and-drop the file itself onto the command line and the entire path to the file will be automatically generated (a handy trick to prevent mis-typing)
  5. when typing your password in the Terminal, the cursor will not progress, so there will be no visual feedback whatsoever about what you’ve typed… so, type your passwords only with total focus on what you’re typing !
  6. ! BEWARE : be sure to double-check your typing when using the command line, as one mis-typed letter can generate an entirely different, unwanted outcome, screwing up your entire OSX installation !
  7. when working in Terminal app on a MacBook (Pro/Air), the advice is not to use an external keyboard, but the on-board keyboard

Now, when you see the prompt appearing, type this (followed by pressing the ENTER-key) :

admin$ sudo su –

Then, when you see the prompt appearing again, type this (followed by pressing ENTER) :

root# chflags -R nouchg [drag .sparsebundle-file here]

Then, at the next prompt, type this (and press ENTER) :

root# hdiutil attach -nomount -noverify -noautofsck [drag .sparsebundle-file here]

And at the next prompt, type this (and ENTER) :

root# tail -f /var/log/fsck_hfs.log

Look closely in this next file when you need to type what, and what the feedback should look like (kind of) :

  • bold green text = this is the command line prompt
  • bold black text = you should manually type exactly this text
  • bold purple text = drag-and-drop your .sparsebundle-file here, and your sparse bundle’s path will be displayed
  • black text = this text is generated by the Terminal, indicating what is busy and/or finished, and will be the same when your replicate this proces
  • blue text = what is displayed here depends on your specific situation
  • if problems are found, they will be listed in-between these lines, and it will also be indicated how it was fixed

console log sparsebundle repair

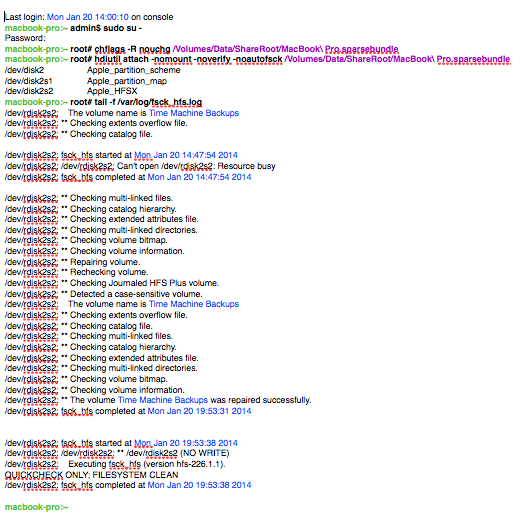
note : as you can see from the time-stamps in the picture, the entire process will take quite a long time to complete (it took nearly 6 hours to repair this harddisk – a 500GB harddrive that was temporarily taken out of a Time Capsule and connected via USB2.0)

so, from there on it’s wait, wait, wait, do something entirely different, wait (again), get a good night’s sleep… and wake up in the morning with a repaired hard drive…

that should be it 😉