I am trying to make a reservation for a repair of my iPhone through the Apple website, and I can go through all the steps until I need to give my password to login with my Apple ID… it just won’t accept the correct password !
What is going on ? And How can I fix this ?
Answer :
Yes, it’s bizar that Apple isn’t clear why this doesn’t work the way you would expect it to… But the solution is simple :
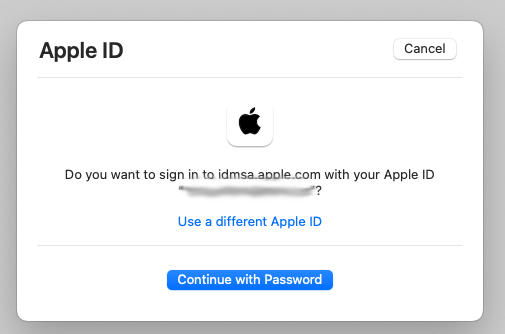
when you get the “Do you want to sign in to dims.apple.com with your AppleID?” window, click the blue “Continue with Password” button
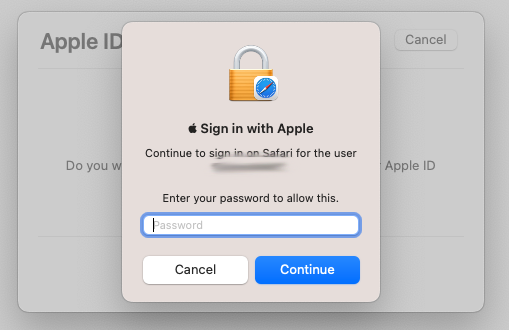
then you will get the “Sign in with Apple” window… and then, DO NOT enter your AppleID password !! ; you need to enter the password you use to unlock your Mac !!
…there is some (weird Apple) logic behind this, but it is completely unclear why Apple made this so confusing… [ Apple is asking for your password to unlock your passwords keychain in Safari ; but you will only get that from the text “Continue to login on Safari for the user” AFTER you have figured out some other way what the solution is… ]
Question : I am currently editing a Word document on my Mac, and was asked to do so in Review mode, so everybody I will send it to will be able to track the changes I’m suggesting. But with each edit or change I make to the document, my spouse’s name is added to it instead of mine…
As my spouse is in no way involved in the content or the editing and reviewing of this document, I don’t want others to get the impression she might be…
So, how do I fix this ?
Answer : The problem you are running into is that your spouse has logged in to her Microsoft Account on your MS Office (maybe to reach her OneDrive or something) and she forgot to log out… here’s how to fix this :
To switch the Microsoft Account from MS Office365 (mainly used for school and business accounts) to Office 2021 for Mac (mainly for private use), do this : – open Word – in the top menu bar, click on ‘Word’ – in the pulldown menu that appears, click on ‘Sign Out’
When done, the ‘Sign Out’ option will disappear from the pull down menu, and no ‘Sign In’ option will appear there… so you need to use a different route : – open Word – in the top menu bar, click ‘File’ – in the pull down menu that appears, click on ‘New from Template…’ – in the new window that opens, click on the ‘Sign In’ button top-left – now a login window will open where you can use various ways of signing in (if you have the MS Authenticator app on your iPhone, the easiest way is to select that option to login) – when logged in, your name and initials will appear in the place where the ‘Sign In’ button used to be
Question : My child has used my Mac and MS Office on it to login to their Microsoft Account to be able to use my printer. Now, when I want to save something in MS Office on my Mac, it is connecting to my child’s school OneDrive…
How do I switch the account back to my own Microsoft Account ?
Answer : To switch the Microsoft Account from MS Office365 (mainly used for school and business accounts) to Office 2021 for Mac (mainly for private use), do this : – open Word – in the top menu bar, click on ‘Word’ – in the pulldown menu that appears, click on ‘Sign Out’
When done, the ‘Sign Out’ option will disappear from the pull down menu, and no ‘Sign In’ option will appear there… so you need to use a different route : – open Word – in the top menu bar, click ‘File’ – in the pull down menu that appears, click on ‘New from Template…’ – in the new window that opens, click on the ‘Sign In’ button top-left – now a login window will open where you can use various ways of signing in (if you have the MS Authenticator app on your iPhone, the easiest way is to select that option to login) – when logged in, your name and initials will appear in the place where the ‘Sign In’ button used to be
Ever since I upgraded to macOS 13 Ventura, after each reboot, I get a warning saying “Legacy System Extension – Existing software on your system loaded a system extension signed by “MATT INGALLS”, which will be incompatible with a future version of macOS. Contact the developer for support.”
What is this about ? And what can or should I do about it ?
Answer :
The reason you get this warning is because you have installed the SoundFlower extension on your Mac. SoundFlower is a FREE system extension that lets you route sound from one application to another. That can be useful to record audio from your Mac, among others…
But… development on SoundFlower seems to have stalled… the latest developer who took over the SoundFlower-project from RogueAmoeba was Matt Ingalls (so that’s where te warning comes from…) but he hasn’t released any new versions recently…
The last version that was released only runs on Intel-Macs (so not on M1 and M2-Macs) and will not be compatible with macOS 14 Sonoma and beyond…
Note : clicking ont the “More info” button in the warning window will lead you to this info on Apple’s website, but it will not give any useful info on SoundFlower
If you want to follow up on Apple’s advice to ‘contact the developer’, you can contact Matt Ingalls here to request a new release of SoundFlower or if you are looking for the latest info on the SoundFlower-project, look here : https://github.com/mattingalls/Soundflower/releases
If you want to remove the Soundflower-extension that is causing this warning, do this : [ a big thanks you to celticparrotj for posing this question ] – click somewhere on the Desktop to open the Finder – make sure that “Finder” is visible next to the Apple-icon in the far left of the top menu bar – select “Go” from the top menu bar – in the pulldown menu that appears, click on “Go to Folder…” – in the search field of popup window that appears, type the following text : /Library/Extensions/ – then hit the [Enter]-key on your keyboard – in the window that opens, the “Extensions” folder will be highlighted and its content will be visible – select the “Soundflower.kext” file and drag it to the Trash – in the popup window that appears, type the password that unlocks your Mac and click “OK” – then empty the Trash – and close all Finder windows
I am creating a one-page document in Apple Pages with a complex layout and all is well until I drag my text boxes too close to the edges of the page… then a new blank page (with header and footer) is created that I can’t delete…
I’ve tried the things that used to work in previous versions of Pages (and work in MS Word), like selecting the page in the thumbnails, but than I get a warning saying “Are you sure you want to delete all content from your document?” and if I click Delete assuming that that will only delete the blank page, it will delete the entire layout-ed page and only leave the blank page (so… exactly the opposite of what I intended) …and if I try the other ‘proven solution’ of setting the cursor on the blank page an then deleting all invisible content on that page by repeatedly pressing the Backspace and/or the Delete key… nothing happens…
What is wrong and how can I fix this ?
Answer :
In the newer versions of Apple Pages (like Pages version 13) you need to choose if your document is going to be a Text Editor document (e.g. an old-style Word document) or a Layout document (e.g. a PowerPoint/Keynote-style document with layout and text boxes). If you want to make your Pages document a Layout document, you have to change that manually, as a new Pages document is set to be a Text Editor document by default. To fix that, do this :
have your document open in Pages
click on the ‘Document’ button (top right in the icon bar of the document window, next to ‘Format’)
in the side panel that opens on the right select the ‘Document’ tab (next to ‘Section’ and “Bookmarks’)
go to the bottom of the ‘Page Orientation’ chapter (just above the ‘Document Margins’ chapter)
there, make sure the checkbox at ‘Document Body’ is empty (by clicking on the checkmark if there is any)
then click ‘Convert’ in the popup screen
then select the unwanted blank last page in the thumbnails on the left and press the ‘Delete’ or ‘Backspace’ key on your keyboard… and the troublesome blank last page will disappear…
note that despite the fact that both are versions from 2018, these will still work with macOS 11.0 Big_Sur
goto your downloads folder
first, double-click on the file named msd_-mac_cs5600f-14_11_5h-ea8_2.dmg
this will mount the ScanGear_CanoScan 5600F_141105.pkg
again, click on that and version 14.11 of the ScanGear driver installer will open
now, follow the on-screen directions and the latest ScanGear driver will be installed
then, double-click on the file named misd-mac-ijscanner2-4_1_4-ea21_3.dmg
this will mount the Canon IJScanner2_040104.pkg
again, click on that and version 4.1.4 the IJScanner2 driver installer will open
now, follow the on-screen directions and the latest IJScanner2 driver will be installed
when done, goto System Preferences > Printers & Scanners
if the CanoScan 5600F is already listed on the left, click it
if not, click the +sign (plus-sign) to add the scanner first
when done, click the CanoScan 5600F in the list on the left
when the scanner details open on the right, click on the “Open Scanner”-button
now, the built-in macOS scanner-app will open and it will immediately do a preview scan of whatever is in the scanner
NOTE : you might run into a small problem every once in a while ; when the automatic scanning preview starts, you might get an error saying “Scanner reported an error – Cannot communicate with scanner for these reasons: – Scanner is turned off. – USB cable is disconnected. Please check and try again.” If so, just flip the scanner’s ON/OFF-switch in OFF-position manually and then back into ON-posistie. That should help in making the scanner preview work again.
I have had a Ubigi SIM in my car for a few years now. Now I will be travelling to Asia this summer and I want to add an eSIM to my (rather recent) iPhone to have a far more interesting data plan than using my pan-european voice&data-plan outside of Europe… I’ve downloaded the eSIMs-app on my iPhone to search for and compare various eSIM providers… since Ubigi had one of the most interesting data-plans and I already have a Ubigi SIM in my car that I am very happy with, I decided to go for the Ubigi eSIM as well…
I was asked to install the Ubigi-app on my iPhone, which I already have (since I need it for my car’s SIM), so I can skip that step and proceed… only to find that in the Ubigi-app I do not get the option to add an Asian data-plan, I am only seeing options to upgrade European data-plans… I’ve looked on the Ubigi-website, but there is no mention of this problem, and I can’t seem to be able to connect to the Ubigi Helpdesk (maybe because it’s a weekend now).
What am I doing wrong ? And how can I fix this ?
Answer :
Yes, it’s odd that Ubigi didn’t consider this option when setting up their app… for now the only solution is to log-out with your current Ubigi-account (the one from your car’s SIM) and create a second/new Ubigi-account… just make sure to use a different eMail-address than the one you used for your car’s SIM… and then log-in to the Ubigi-app using that second Ubigi-account.
Yes, is a little bit of a hassle, especially since switching back and forth between the two accounts is needlessly time-consuming… but for now (until Ubigi adds this option to it’s app) this is the only way to get it to work… Just remember that as long as you are abroad, you are probably not with your car, and the other way around, so switching will only be needed when you step into the plane and when you return home…
Note : the option to create an extra eSIM on your iPhone is available on iPhone XR, iPhone XS, iPhone XS Max, iPhone SE 2 and all versions of iPhone 11 and newer (so all iPhones introduced from 2018 onwards) and all cellular-equipped iPad variations introduced since fall of 2018. A complete list of iPhones & iPads with eSIM capability can be found here.